


Drip irrigation is the backbone of efficient growing — in cannabis, greenhouse vegetables, nurseries, and every kind of controlled-environment agriculture. Done right, it delivers water and nutrients precisely to each plant, cuts waste, and makes crop steering possible. Done wrong, you get uneven feeding, clogs, and headaches. This guide covers the setup we recommend and build for our customers — from the facility mainline down to the emitter at each pot — alongside the drip fundamentals every grower should know.
Drip Irrigation Basics: Emitters and Flow Rates
At its core, drip irrigation delivers water slowly and directly to the root zone through emitters — also called drippers (the two terms mean the same thing). They’re rated by flow, usually 0.5, 1, 2, or 4 gallons per hour (gph). Your total system flow is simply the number of emitters multiplied by their flow rate — the starting point for sizing your lines and pump. University extension programs like the University of Florida and Colorado State offer solid primers on the fundamentals.
The advantage over hand-watering or overhead systems is precision: every plant gets the same amount, at the same time, with almost no runoff. That’s what makes drip the standard for any operation that cares about consistency and cost.
How Water Reaches Your Tables: Facility Piping Layouts
Before water ever reaches a plant, it moves through a hierarchy: a mainline carries water through the facility, submains (also called headers or manifolds) branch off to distribute it into each room, laterals run down each table, and emitters meter it to each pot. How you lay out the mainline and submains — before you ever reach the tables — sets the tone for the whole system. A few common facility-level layouts:
| Layout | How it works | Trade-off |
|---|---|---|
| Trunk-and-branch (one-header) | A single main runs through the facility; submains branch off to feed each room and table | Efficient, less material, easy to expand — our preferred approach |
| Looped / ring main | The mainline runs a loop and connects back to itself, feeding branches from both directions | More even pressure and some redundancy, but more pipe and cost |
| Home-run / manifold | Each room or zone gets its own dedicated line from a central manifold (what some call spider piping) | Maximum isolation, but the most pipe, cost, and complexity |
We run the trunk-and-branch, one-header approach: a single Schedule 80 header runs down the hall, tees into each room, and tees again to each table, where it drops to .52″ PE tubing. It uses far less material than a home-run/manifold layout, keeps water velocity high enough to stay clean, and — critically — it’s easy to modify when a room changes. Irrigation manufacturers like Rivulis and greenhouse micro-irrigation guides lay out the same mainline-and-submain fundamentals, and we’ve written about why one header beats spider piping and home runs.
The one trade-off: because a single header feeds each table off the same line, zones feed one at a time (staggered) rather than all at once. On a manual system that’s a real consideration — but with the Paragon, the gap between feeds can be under five seconds, so staggered feeding is effectively instant. The simplicity, lower cost, and cleaner lines far outweigh it. For more on sizing traps, see our guide to piping mistakes.
How We Set Up Irrigation on Tables
Here’s the table setup we recommend — and what our customers consistently stick with and love:
- A single Schedule 80 header runs down the hall and tees into each room.
- Inside the room, that header tees off to each table, where it drops down to Rivulis (or equivalent) .52″ white PE tubing — the same tubing we stock in our shop.
- That .52″ line runs straight down each table (one line per table), with an emitter (dripper) at each pot feeding the plant.
- At the end of each run we add a Power-Loc valve (or equivalent — see our store). It stays closed until it’s time to flush the lines, which growers typically do after harvest.
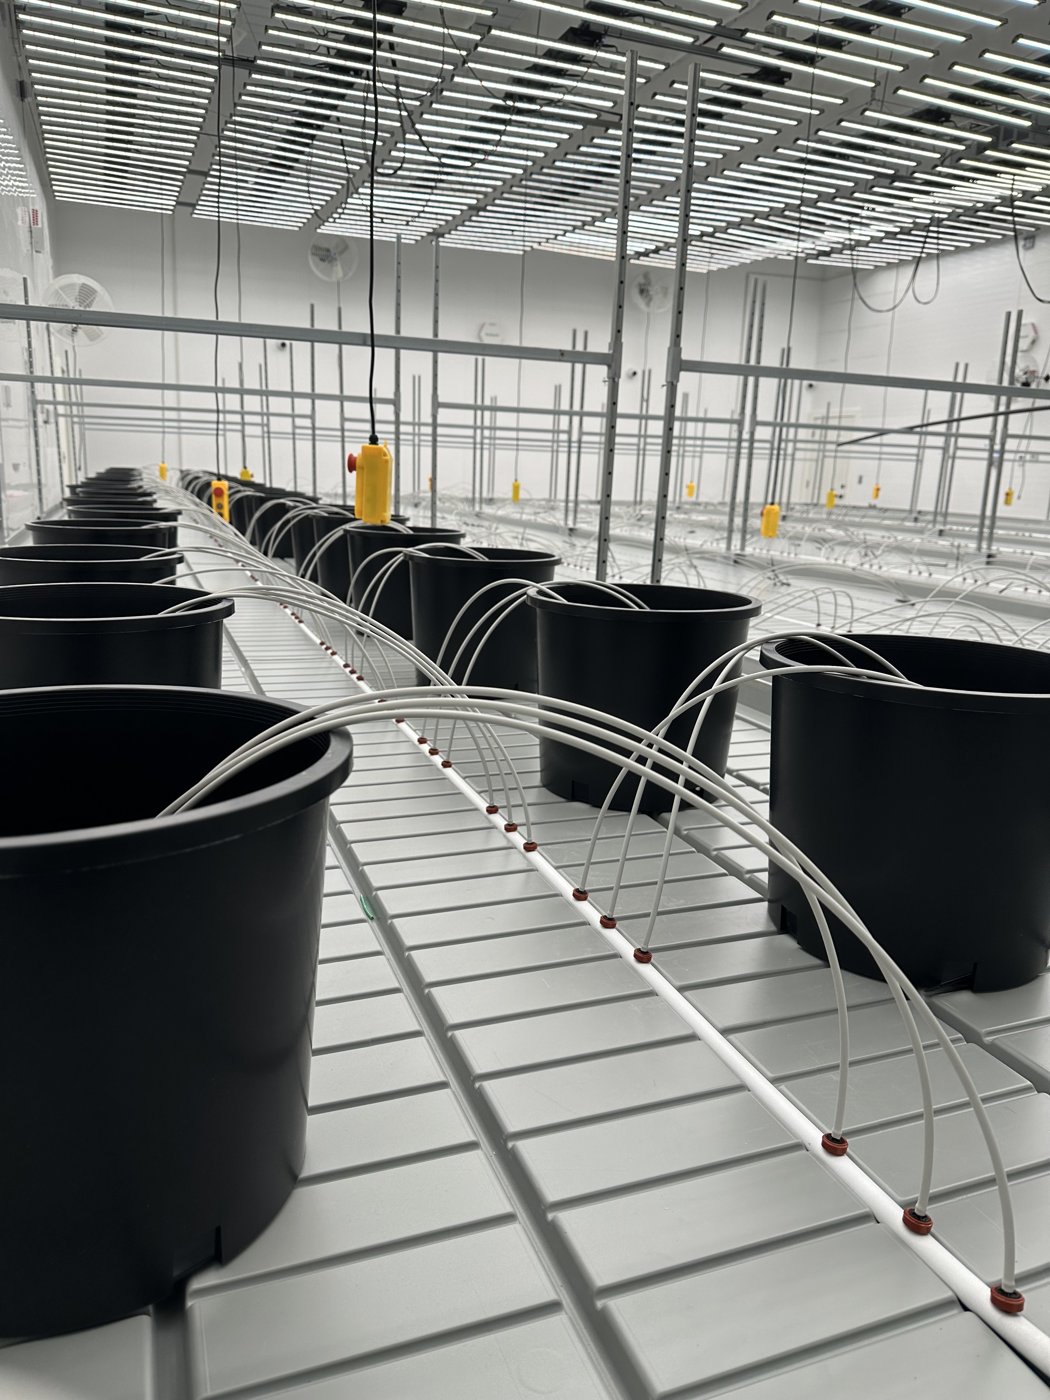
Why we don’t recommend hard pipe on the tables. A lot of grows run rigid PVC across their tables, and it creates two headaches. First, it’s a pain to modify — move a pot or change a layout and you’re cutting and re-gluing pipe, whereas PE tubing swaps out in minutes. Second, the Schedule 40 PVC most people reach for is white and lets light pass through — and light in your lines feeds algae and biofilm that clog emitters and harbor pathogens. That’s exactly why the header itself is opaque grey Schedule 80: it blocks light where the water travels. On the tables, flexible PE tubing keeps everything easy to maintain. (Here’s how to choose the right PVC for your hard-pipe runs.)
Choosing Emitters and Spacing
On a table-and-pot setup, the rule is simple: one emitter (dripper) per pot, placed at the pot location. Match the emitter flow rate to your pot size and crop — larger pots and thirstier plants (mothers, for example) may call for a higher gph or multiple drippers. For in-ground or bed setups, extension guides suggest emitter spacing around 12 inches for closely-spaced crops, tighter (8″ or even 4″) in sandy soils that don’t spread water laterally.
Whatever you choose, keep each zone consistent — plants of the same size and stage on the same emitter type and flow — so your feed stays uniform within the zone. (A veg room of small pots and a mom room of large ones will run different drippers; that’s expected. What matters is consistency within each zone.) Uniform delivery within a zone is what lets you read runoff EC and trust the number.
Pressure, Filtration, and Emitter Type
A few details separate a drip system that feeds evenly from one that doesn’t:
- Pressure. Drip runs at low pressure — roughly 15–25 psi. On our systems, the Paragon’s pump plus a pressure-reducing valve (PRV) dial that in. On a non-Paragon setup, add a pressure regulator after your source, since municipal water (often 40–80 psi) is far too high and will blow out emitters.
- Pressure-compensating (PC) emitters. For even feeding across a long run, PC emitters hold a constant flow over a wide pressure range — so the last pot on the line gets the same shot as the first, even with slope or friction loss. They’re one of the simplest ways to guarantee uniformity.
- Filtration. A screen or disc filter keeps sediment from clogging emitters. Paragon builds typically lean on clean upstream water — RO and UV — but on most other systems an inline filter is essential insurance.
Flushing and Maintenance
That flush valve at the end of each line isn’t an afterthought — it’s how you keep the system healthy. Kept closed during the grow, it maintains pressure through the emitters. Opened after harvest, it lets you push clean water (or a line-cleaning solution) all the way through to blow out any buildup before the next cycle. Combined with clean source water — RO and UV filtration — regular flushing is the single best defense against clogged emitters.
Drip Irrigation Setup FAQ
What size tubing should I run on the tables?
.52″ white PE, dropped from a Schedule 80 header. It’s flexible, swaps out in minutes, and opaque enough to resist algae — unlike the rigid white Sch40 a lot of grows use.
How many emitters per plant, and what flow rate?
One emitter per pot as a baseline, at 0.5–4 gph depending on pot size and stage. Mothers and large pots may want 2–3 emitters or a higher-flow pressure-compensating dripper, so the last pot on the line gets the same shot as the first.
What pressure should a drip system run at?
Roughly 15–25 psi. The Paragon’s pump plus a PRV dial it in; on a manual system, add a pressure regulator after your source — city water at 40–80 psi will blow out emitters.
What’s the catch with a one-header layout?
Zones feed one at a time (staggered) instead of all at once. On a manual system that matters; with the Paragon the gap between feeds is under five seconds, so it’s effectively instant — and you get far less tubing and easier maintenance in return.
How often should I flush the lines?
Every harvest at minimum, via the end-of-run valve. Flush more often on hard or high-organic water to stay ahead of buildup.
Does this only work for cannabis?
No — the same header-to-table layout runs greenhouse vegetables, nursery stock, and any benched or potted crop.
Build It Right the First Time
A clean drip setup pays off every single day of the grow. Keep it simple — a single Schedule 80 header down the hall, one .52″ PE line per table, emitters at each pot, and a flush valve on the end — and there’s less to spend on materials, less to troubleshoot, and more uniform results. We stock the .52″ tubing, emitters, and Power-Loc valves to do it, and we design and build complete systems around the Paragon. Reach out and we’ll help you lay out your room.

Pre-Harvest Flush: How (and Whether) to Flush Your Crop
The pre-harvest flush is the final step of the grow — the stretch where you stop feeding and water with plain, clean water to clear

Biofilm & Clogged Emitters: Keep Your Drip Lines Clean
A clogged emitter is a plant that isn’t getting fed. It happens quietly — one dripper slows, then a few, and suddenly you’ve got dry

Hard Water & Alkalinity: What Growers Need to Know
Hard water and alkalinity are two of the most misunderstood — and most damaging — problems in a grower’s source water. They quietly push your

Root Rot & Pythium: How to Prevent and Treat It
Root rot is the silent killer of the grow room. By the time you see it up top — wilting, yellowing, stunting — the damage
Pre-Harvest Flush: How (and Whether) to Flush Your Crop
The pre-harvest flush is the final step of the grow — the stretch where you stop feeding and water with plain, clean water to clear
Biofilm & Clogged Emitters: Keep Your Drip Lines Clean
A clogged emitter is a plant that isn’t getting fed. It happens quietly — one dripper slows, then a few, and suddenly you’ve got dry
Hard Water & Alkalinity: What Growers Need to Know
Hard water and alkalinity are two of the most misunderstood — and most damaging — problems in a grower’s source water. They quietly push your
Root Rot & Pythium: How to Prevent and Treat It
Root rot is the silent killer of the grow room. By the time you see it up top — wilting, yellowing, stunting — the damage